I’ve always struggled with making enclosures and custom parts for my projects, so when ACMER offered to send me their ACMER S1 mini laser engraver to test, I was excited to give it a try. In this article, I’ll walk you through my experience unboxing, setting up, and putting this compact laser to work. It’s one of the smallest engravers out there—just 25x25 cm with a 130x130 mm working area—but it’s perfect for hobbyists looking to add personal touches to their creations or dive into laser engraving for the first time.
ACMER S1 Portable Laser Engraver Mini Machine - 15% OFF - Use Code: OBMSCODE
Use coupon 4G1MRX1AE66G for 10% off on anything off their shop.
Check out other ACMER products
Unboxing the Laser Engraver
Inside the box, everything was neatly packed: the machine itself, a 3.5W laser module (also available in 2.5W and 6W versions), safety glasses, a power adapter, USB cable, and even some sample materials to experiment with. The setup was straightforward—just mount the laser, tighten a screw, and plug in a single cable. Before powering it on, I took a moment to inspect the sturdy aluminum frame, built-in measurement markings, and the simple front-panel controls. Now, let’s see what this little machine can do.
Focusing the Laser
Getting the laser perfectly focused is one of those small but crucial steps that makes all the difference in engraving quality. The ACMER S1 comes with a handy 2mm acrylic spacer to help with this. To focus the laser, I placed the spacer directly on top of the material I wanted to engrave—in this case, a piece of birch plywood. Then, I loosened the screw on the laser module, gently lowered it until it rested on the spacer, and tightened everything back up.
Removing the spacer left the laser positioned exactly 2mm above my workpiece—the ideal distance for sharp, clean engravings. It is a simple procedure but it is absolutely necessary when you switch to engrave different materials.
Configuring the Software
The engraver works with two main programs: LaserGRBL (free) and LightBurn (paid, but with a 30-day trial). I started with LaserGRBL but then moved to LightBurn since its interface looked more polished and it offered extra features I wanted to test. After installing it, I connected the engraver via USB-C and powered it on—the familiar beep confirmed it was ready.
Inside LightBurn, I had to select the right COM port—mine showed up as COM10—and establish the connection. The software automatically recognized the engraver's working area, which saved time. I played with the settings, adjusting speed and power levels to find what worked best for different materials. The "Frame" feature became my best friend—it outlines your design with the laser before engraving, so you can double-check positioning. After a few test runs, I felt comfortable enough to move from simple shapes to my first real project.
First Engraving Test on Wood
I started with a scrap piece of 4mm birch plywood to put the ACMER S1 through its paces. After loading my logo into LightBurn, I set the engraving parameters to 10 lines per millimeter, 1000mm/min at 80% power. I had no idea where to start so this sounded like a good start.
When the laser started moving, I watched as crisp black lines gradually revealed my logo in the wood's surface. The result surprised me—the engraving was much deeper than expected, almost halfway through the plywood. While the dark, high-contrast look was striking, I realized I could've used faster speeds or lower power for a lighter touch. Still, the precision impressed me—tiny details in the design came through perfectly, proving this little laser could handle intricate work.
For my next test, I ran LightBurn's material calibration template—a grid of squares engraved at different speed and power combinations. This revealed that 30% power at 500mm/min gave the cleanest results for shallow wood engraving, a valuable reference for future projects. The calipers confirmed the machine's accuracy too—every 5mm test square measured spot-on.
Experimenting with 3D Printed Engraving
Curious about how the laser would interact with plastic, I grabbed a 3D printed test piece I'd made for another project. Aligning it was tricky—the small size made precise positioning difficult. After some adjustments, I ran the engraving at 2,200mm/min with 80% power, watching as the laser traced my design onto the textured plastic surface.
The result was subtle but effective—the laser melted the print lines without cutting deeply, creating a nice shiny text. While not as dramatic as wood engraving, it showed potential for adding labels or decorative touches to functional prints.
DIY PCB Creation with the Laser Engraver
To showcase how a laser engraver can be used inside an electronics workshop, I wanted to try to build a PCB with the laser.
Since the laser can't directly engrave copper, I had to get creative. First, I cut a small piece of copper-clad board and coated it with black spray paint, creating a light-sensitive surface. While that dried, I tried an alternative method using a simple black marker on another copper piece—just like we did in school for DIY circuit boards.
The piece with the black marker did not really worked as expected as there was not enough coverage on the copper surface and the laser did not removed all of the paint in one pass.
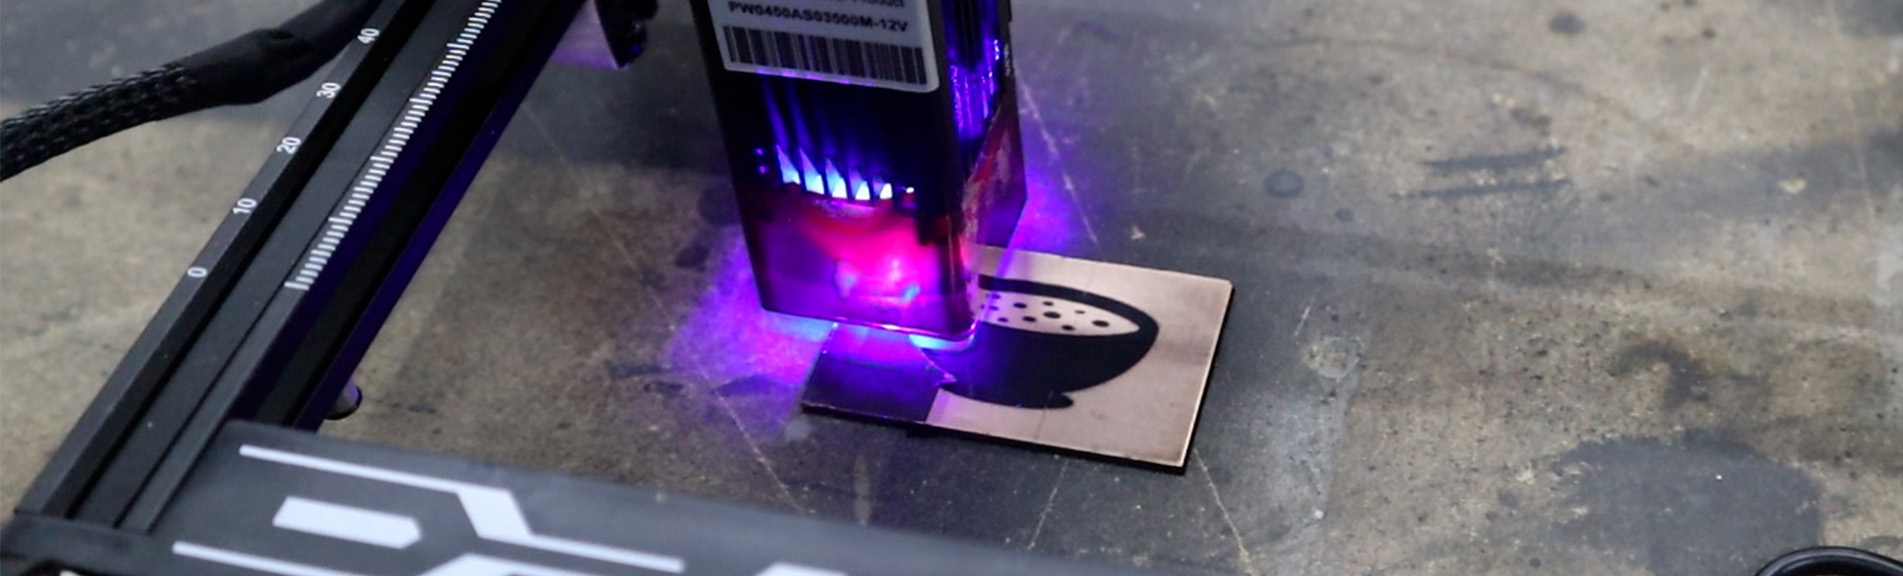
The spray painted piece however, behaved much differently and the laser removed most of the paint in the first pass but I was not happy so I opted to run the engraving one more time, but this time with movement rotated by 90 degrees.
Thanks to my laptop battery dying mid-engraving, the second pass stopped prematurely, so I decided to clean the board with some IPA to see the results. The second pass have eaten through the spray paint entirely, while the first pass still had a lot of paint left so I decided to re-align the board and finish the second pass.
This did not turned well, but it was good enough for a test piece.
Etching the PCB
With the copper board prepped, it was time for the messy part—chemical etching.
I mixed hydrochloric acid and hydrogen peroxide in a plastic container (safety glasses and gloves on, of course). I used 15% hydrochloric acid and 3% solution of hydrogen peroxide in a 1:1 ratio. I found this to be recommended online and in general it worked nicely.
I kept the board moving constantly with an acrylic stirrer to ensure even etching. After about a few minutes, the magic happened—where the laser had removed the paint, the copper vanished completely, leaving only my designed logo behind.
A quick rinse in water stopped the reaction, and I used some paint thinner to remove the remaining spray paint from the top surface. This exposed the protected copper underneath, showing my logo on it.
Final Results and Verdict
After putting the ACMER S1 through its paces—engraving wood, marking 3D prints, and even etching homemade PCBs—I'm pleasantly surprised by what this compact machine can do. The wood engravings came out deep and crisp, with impressive detail for such an affordable laser. The PCB experiments proved more challenging, but the fact that it worked at all speaks volumes about the S1's precision when properly dialed in.
While the 3.5W laser won't replace industrial machines, it's a fantastic starter tool for makers.
The metal frame feels sturdy, setup is straightforward, and LightBurn integration makes designing intuitive. In its price range, the S1 delivers remarkable value.
If you're looking to dip your toes into laser engraving without breaking the bank, this little machine punches well above its weight class.
The links below are affiliate links. When you click on affiliate links in my articles or videos, it means I may earn a small commission if you make a purchase. These links are a way to support my work without costing you anything extra—the price you pay stays the same, whether you use the link or not. The commissions I earn help cover the costs of creating free content, so I can keep sharing knowledge and helping you with your DIY projects. It’s a win-win: you get the tools or products you need, and I get to keep creating helpful resources for everyone. Thank you for your support!
- PCB Board Copper Clad Plate - https://s.click.aliexpress.com/e/_oD7xLDR
- Micro Drill Bits - https://s.click.aliexpress.com/e/_oomqcpT
- CNC Router Engraving Bit - https://s.click.aliexpress.com/e/_oEMDVk9
- Bench Power Supply - https://s.click.aliexpress.com/e/_oEToEPB
- Soldering Station - https://s.click.aliexpress.com/e/_oDcYvEp
- Multimeter - https://s.click.aliexpress.com/e/_olIz7rF


